
Internet Protocol Version 6 - Phần II: Triển Khai DNS & DHCP Trên Nền IPv6
Tài liệu :: Luli :: Công nghệ nổi bật :: IPv6
Trang 1 trong tổng số 1 trang
![]()
 Internet Protocol Version 6 - Phần II: Triển Khai DNS & DHCP Trên Nền IPv6
![]() Admin Wed Jun 27, 2012 11:20 am
Admin Wed Jun 27, 2012 11:20 am
I. Giới thiệu Tổng quan về IPv6
II. Chuẩn bị
Bài lab bao gồm 2 máy:
- Máy Server: Windows Server 2008
- Máy Client: Windows Server 2008 hoặc Windows Vista
III. Thực hiện
1. Cấu hình TCP/IPv6
Tại máy Server, log on Administrator, vào Start\Settings chọn Network Connections
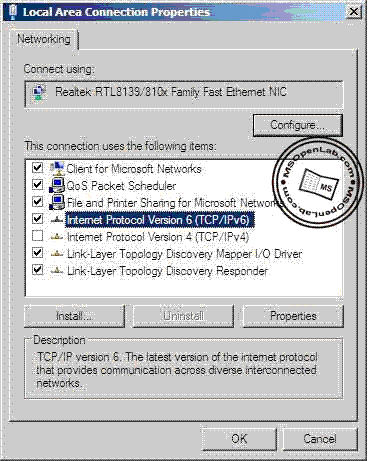
Trong cửa sổ Network Connections, chuột phải Local Area Connection chọn Properties
Hộp thoại Local Area Connection Properties, bỏ dấu chọn Internet Protocol Version 4 (TCP/IPv4), chọn Internet Protocol Version 6 (TCP/IPv6), chọn Properties
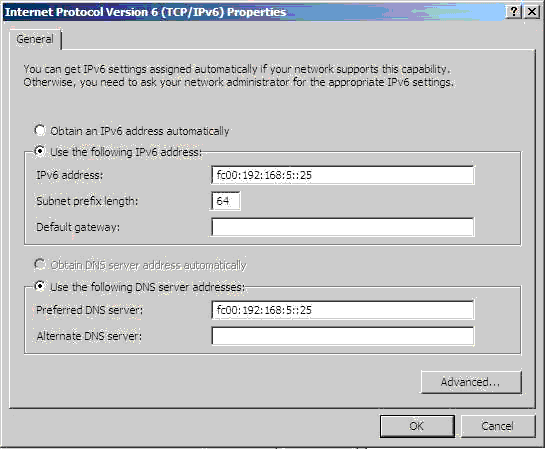
Trong cửa sổ Internet Protocol Version 6 (TCP/IPv6) Properties, nhập thông số TCP/IP như sau:
IPv6 address: fc00:192:168:5::25
Subnet prefix length: 64
Preferred DNS server: fc00:192:168:5::25
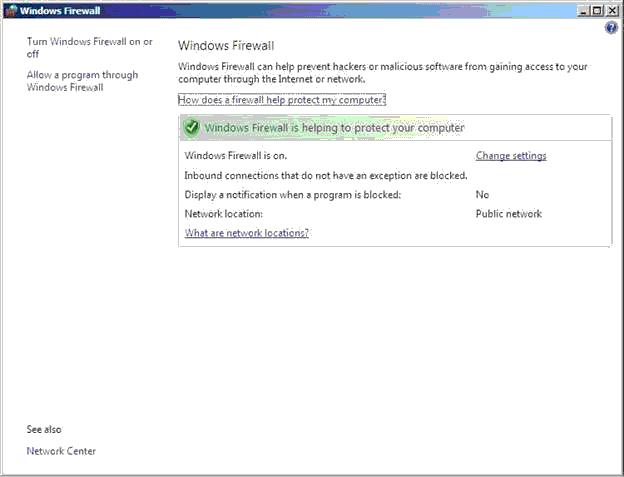
Mở Windows Firewall từ Control Panel, chọn Change settings
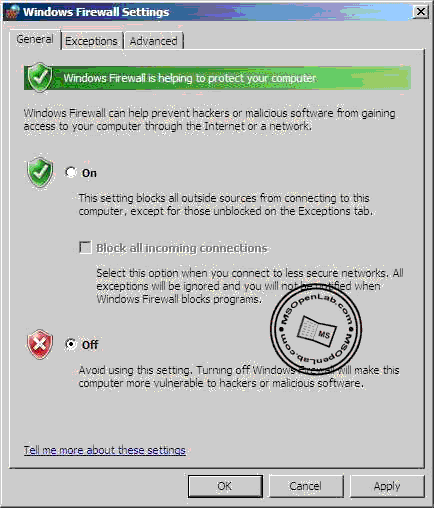
Trong hộp thoại Windows Firewall Settings, chọn Off, chọn OK
Mở System từ Control Panel, trong cửa sổ System chọn Change settings
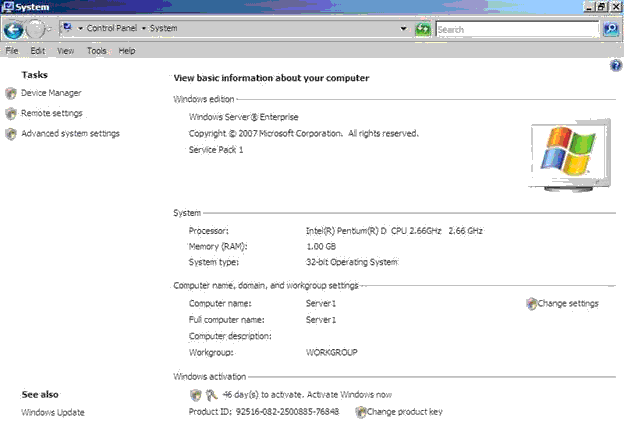
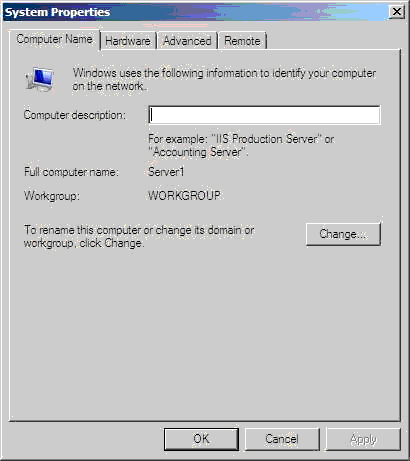
Trong hộp thoại System Properties, vào tab Computer Name, chọn Change
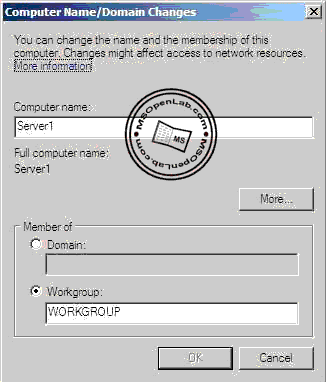
Hộp thoại Computer Name/Domain Changes, chọn More
Hộp thoại DNS Suffix and NetBIOS Computer Name, nhập MSOpenLab.com vào ô Primary DNS suffix of this computer, chọn OK 3 lần

Trong hộp thoại System Properties, chọn Close

Hộp thoại yêu cầu restart máy, chọn Restart Now
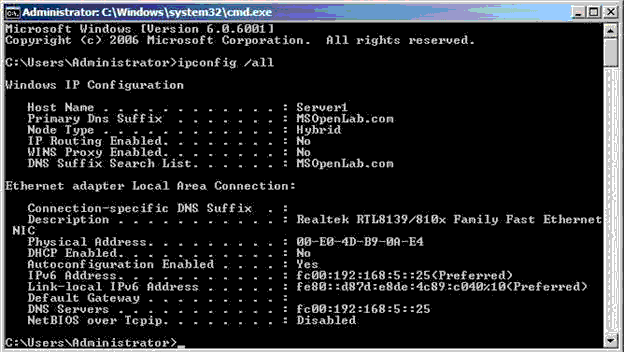
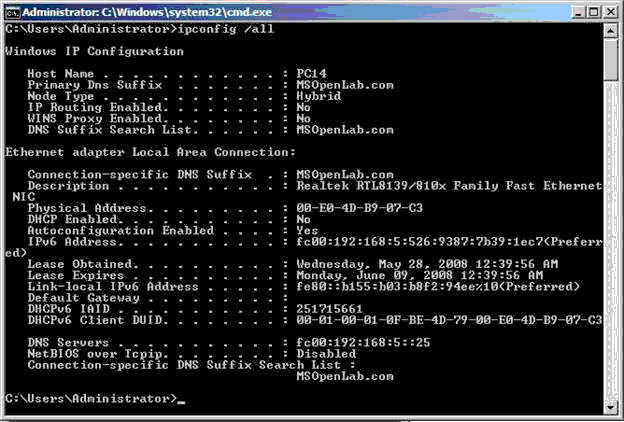
Sau khi khởi động máy thành công, log on Administrator, mở command line, gõ lệnh ipconfig /all, kiểm tra thông tin như trong hình bên dưới.
2. Cài đặt DNS Server role
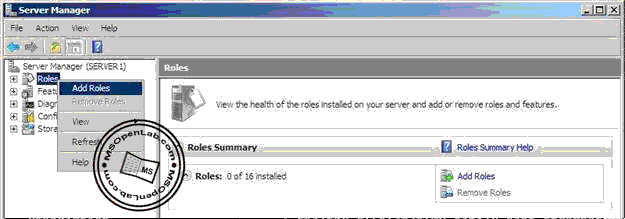
Tại máy Server, log on Administrator, mở Server Manager từ Administrative Tools
Trong cửa sổ Server Manager, chuột phải Roles chọn Add Roles
Hộp thoại Before You Begin, chọn Next
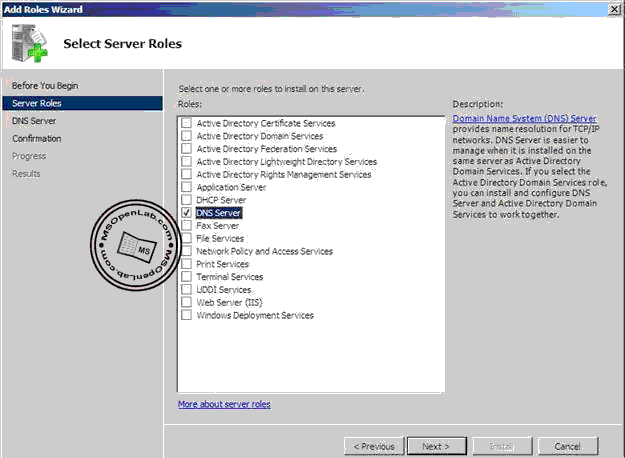
Trong hộp thoại Select Server Roles, đánh dấu chọn DNS Server, chọn Next
Hộp thoại DNS Server, chọn Next
Hộp thoại Confirm Installation Selections, chọn Install
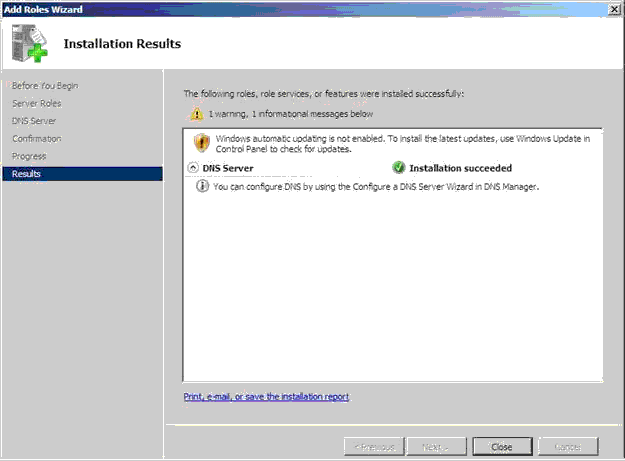
Hộp thoại Install Results, chọn Close
3. Cấu hình DNS Server
Tại máy Server, sau khi cài đặt DNS thành công, mở DNS Manager từ Administrative Tools
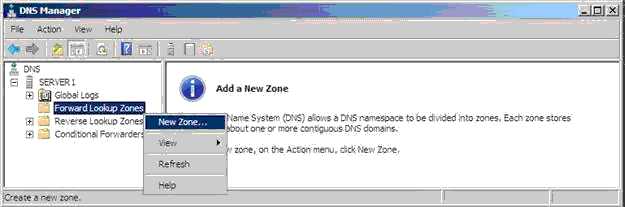
Trong cửa sổ DNS Manager, bung Server1, chuột phải Forward Lookup Zones, chọn New Zone
Hộp thoại Welcome to the New Zone Wizard, chọn Next
Trong hộp thoại Zone Type, chọn Primary zone, chọn Next
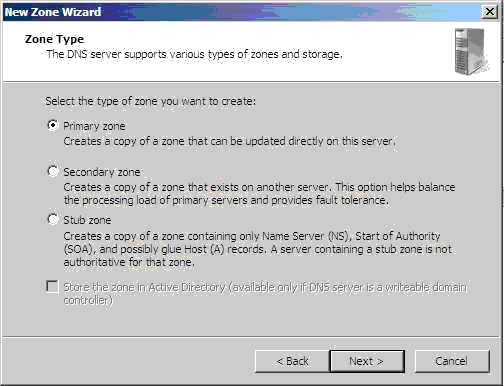
Hộp thoại Zone Name, nhập MSOpenLab.com vào ô Zone name, chọn Next

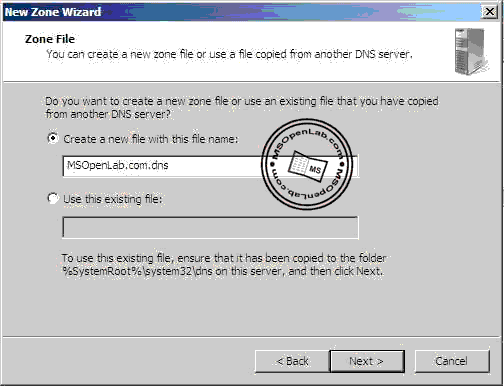
Hộp thoại Zone File, chọn Next
Trong hộp thoại Dynamic Update, chọn Allow both nonsecure and secure dynamic updates, chọn Next

Hộp thoại Completing the New Zone Wizard, chọn Finish

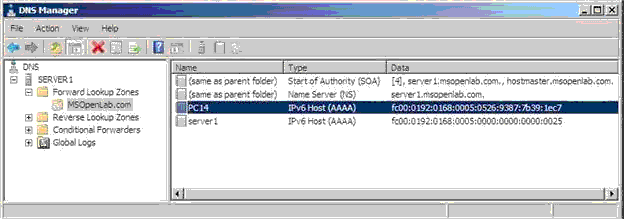
Trong cửa sổ DNS Manager, kiểm tra tạo thành công zone MSOpenLab.com, trong zone MSOpenLab.com có IPv6 Host record server1

Trong cửa sổ DNS Manager, chuột phải Reverse Lookup Zones, chọn New Zone

Hộp thoại Welcome to the New Zone Wizard, chọn Next
Trong hộp thoại Zone Type, chọn Primary zone, chọn Next
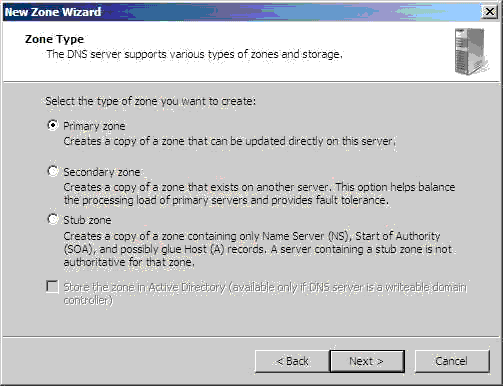
Trong hộp thoại Reverse Lookup Zone Name, chọn IPv6 Reverse Lookup Zone, chọn Next
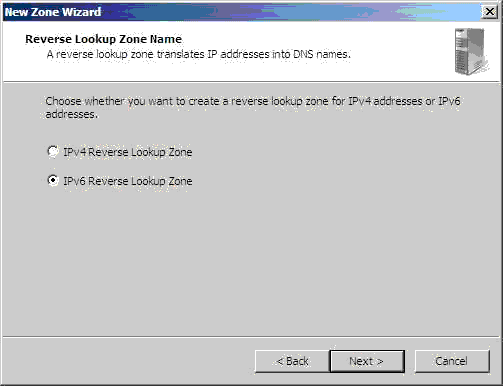
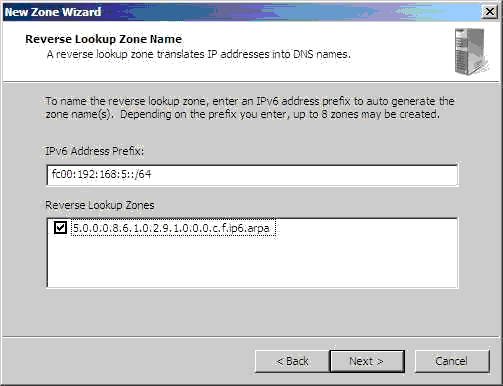
Trong hộp thoại Reverse Lookup Zone Name, nhập địa chỉ như trong hình bên dưới
Hộp thoại Zone File, nhập msopenlabnet.dns vào ô Create a new file with this file name, chọn Next

Trong hộp thoại Dynamic Update, chọn Allow both nonsecure and secure dynamic updates, chọn Next

Hộp thoại Completing the New Zone Wizard, chọn Finish
Trong cửa sổ DNS Manager, kiểm tra tạo thành công Reverse Lookup Zone

Mở Command Line, gõ lệnh ipconfig /registerdns
Mở DNS Manager, vảo zone 9.0.0.0.8.6.1.0.2.9.1.0.0.0.c.f.ip6.arpa, kiểm tra có Pointer record như trong hình bên dưới

Mở Command Line, gõ lệnh dnscmd /config /enableIPv6 1

4. Cài đặt DHCP Server role
Tại máy Server, mở Server Manager từ Administrative Tools, chuột phải Roles chọn Add Roles

Hộp thoại Before You Begin, chọn Next
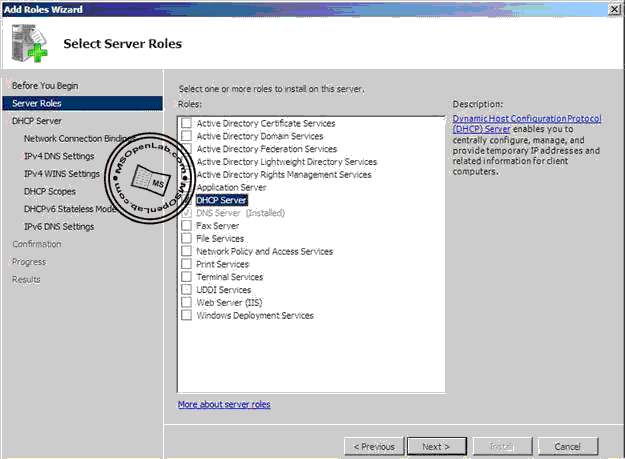
Trong hộp thoại Select Server Roles, đánh dấu chọn DHCP Server, chọn Next
Hộp thoại DHCP Server, chọn Next
Hộp thoại Select Network Connection Bindings, kiểm tra có đánh dấu chọn fc00:192:168:5::25, chọn Next

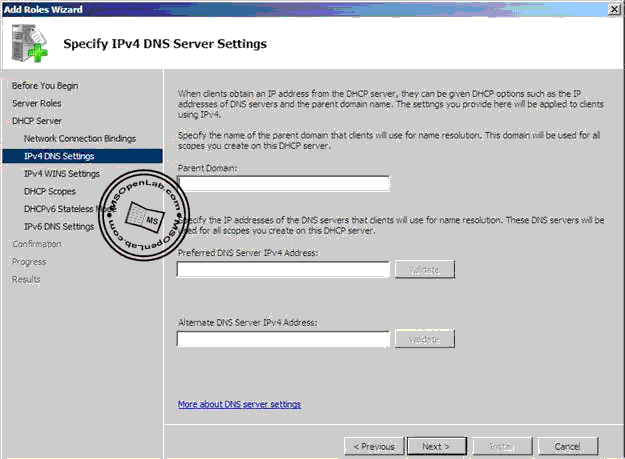
Hộp thoại Specify IPv4 DNS Server Settings, chọn Next
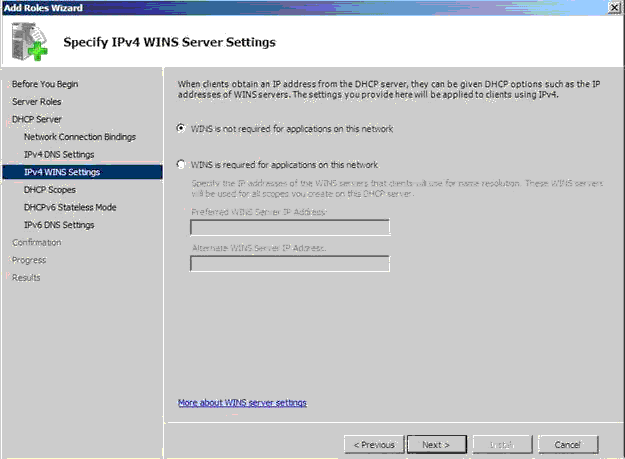
Hộp thoại Specify IPv4 WINS Server Settings, chọn WINS is not required for applications on the network, chọn Next
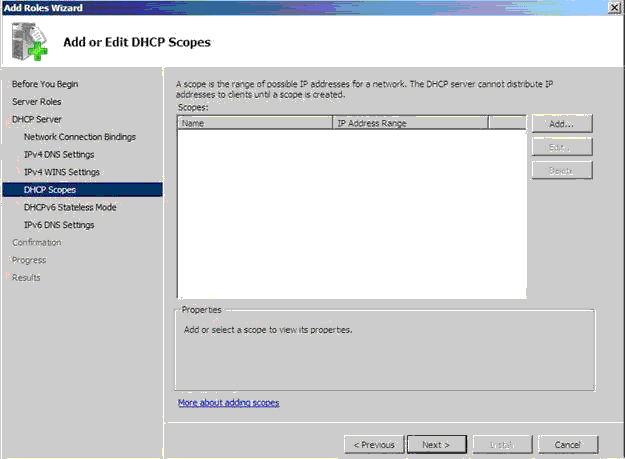
Hộp thoại Add or Edit DHCP Scopes, chọn Next
Trong hộp thoại Configure DHCPv6 Stateless Mode, chọn Enable DHCPv6 stateless mode for this server, chọn Next

Trong hộp thoại Specify IPv6 DNS Server Settings, nhập MSOpenLab.com vào ô Parent Domain, nhập fc00:192:168:5::25 vào ôPreferred DNS Server IPv6 Address, chọn Next

Hộp thoại Confirm Installation Selections, chọn Install
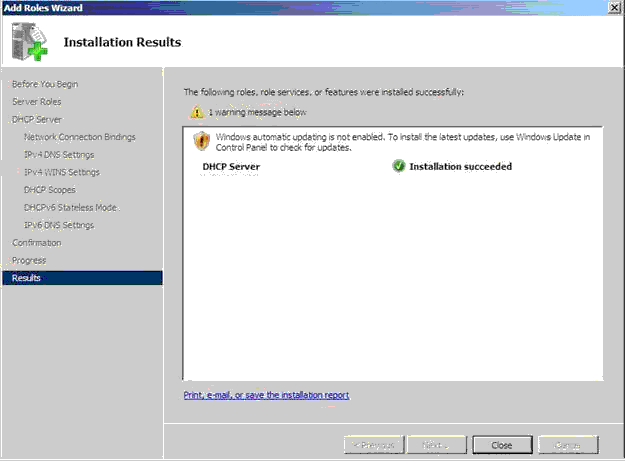
Hộp thoại Installation Results, chọn Close
5. Cấu hình DHCP Scope
Tại máy Server, sau khi cài đặt DHCP thành công, mở DHCP từ Administrative Tools
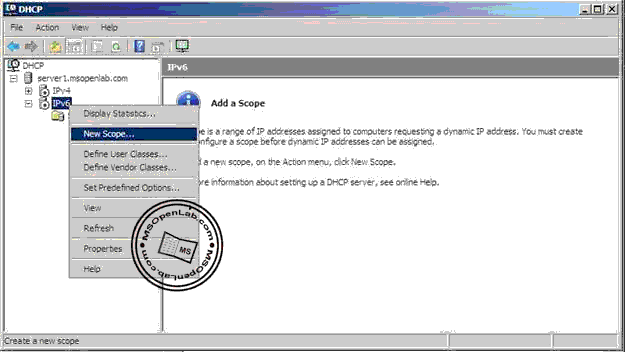
Trong cửa sổ DHCP, bung server1.msopenlab.com, chuột phải IPv6 chọn New Scope
Hộp thoại Welcome to the New Scope Wizard, chọn Next
Trong hộp thoại Scope Name, nhập IPv6 Scope vảo ô Name, chọn Next
Trong hộp thoại Scope Prefix nhập fc00:92:168:5:: vào ô Prefix, chọn Next

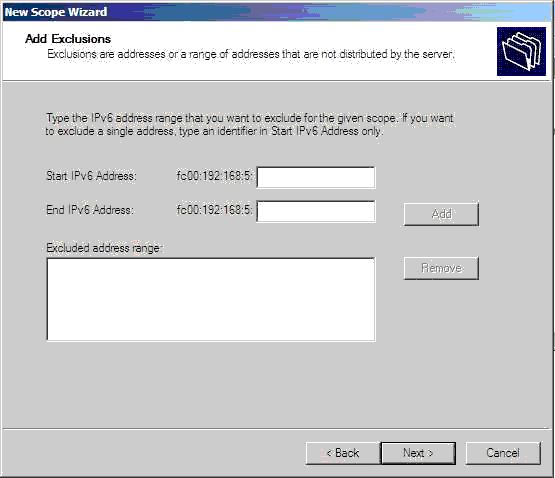
Hộp thoại Add Exclusions, chọn Next
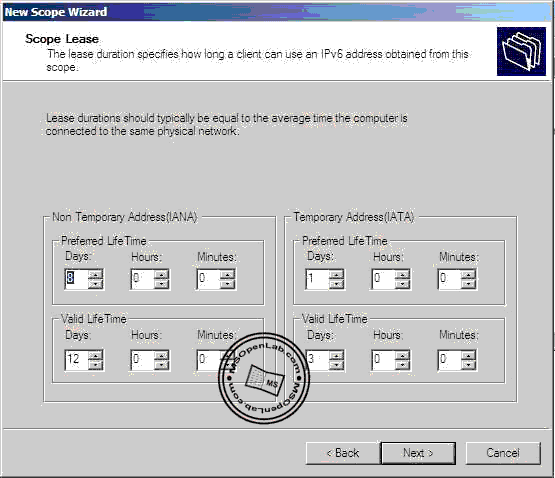
Hộp thoại Scope Lease, chọn Next
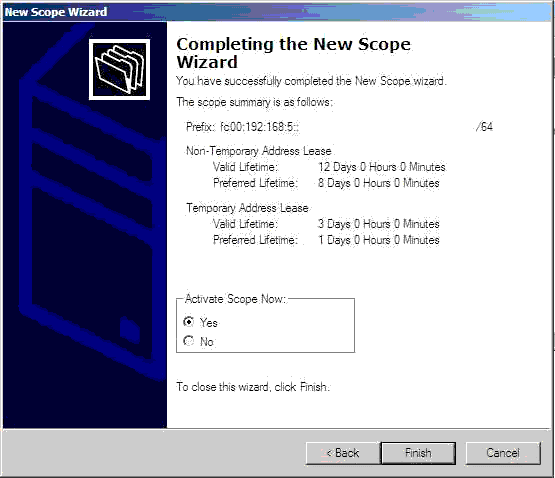
Hộp thoại Completing the New Scope Wizard, chọn Finish
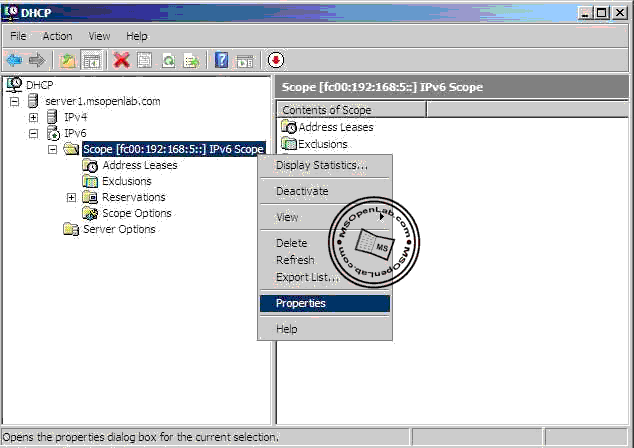
Trong cửa sổ DHCP, bung IPv6, chuột phải Scope[fc00:192:168:5::25] chọn Properties
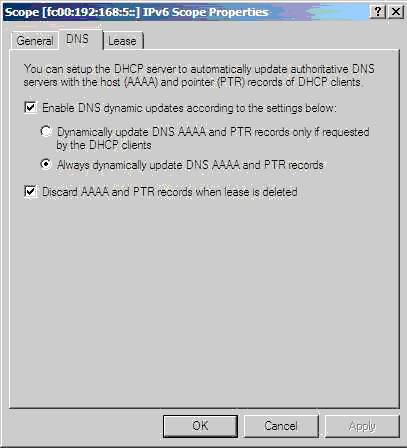
Trong hộp thoại Scope[fc00:192:168:5::25] Scope Properties, qua tab DNS, chọn Always dynamically update DNS AAA and PTR record, chọn OK
6. Cấu hình Client sử dụng IPv6
Tại máy Client, log on Administrator, vào Start\Setting chọn Network Connections
Trong cửa sổ Network Connection, chuột phải Local Area Connection, chọn Properties
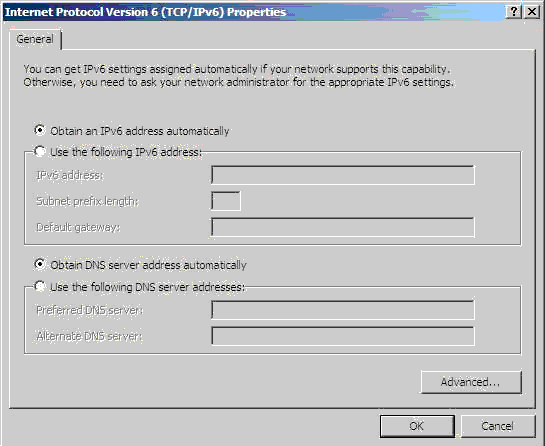
Trong hộp thoại Local Area Connection Properties, bỏ dấu chọn Internet Protocol Version 4 (TCP/IPv4), đánh dấu chọn Internet Protocol Version 6 (TCP/IPv6), chọn Properties

Trong hộp thoại Internet Protocol Version 6 (TCP/IPv6) Properties, chọn Obtain an IPv6 address automatically và Obtain DNS server address automatically, chọn OK 2 lần
Mở Command Line, gõ lệnh như hình bên dưới

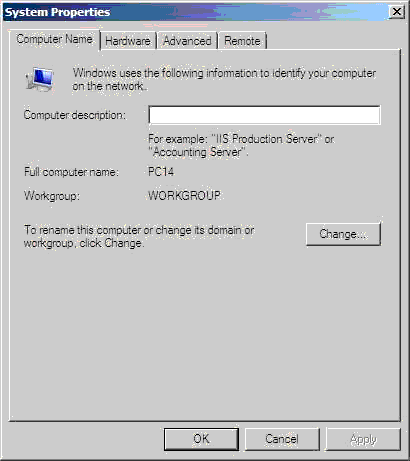
Mở System từ Control Panel, chọn Change settings
Trong hộp thoại System Properties, chọn Change
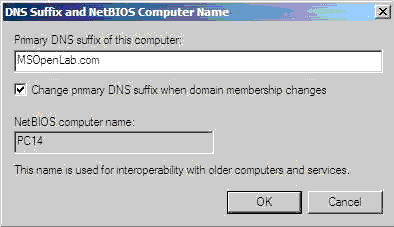
Hộp thoại Computer Name/Domain Changes, chọn More
Trong hộp thoại DNS Suffix and NetbIOS Computer Name, nhập MSOpenLab.com vào ô Primary DNS suffix of this computer, chọn OK3 lần
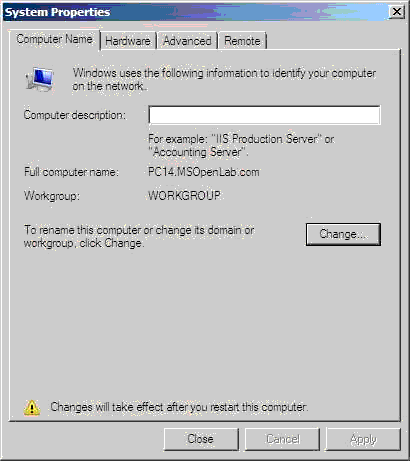
Hộp thoại System Properties, chọn Close
Hộp thoại Microsoft Windows, chọn Restart Now
Sau khi khởi động máy Client, mở Command Line, gõ lệnh ipconfig /registerdns
Trong cửa sổ Command Line, gõ lệnh ipconfig /all, kiểm tra máy Client nhận được thông số TCP/IP từ máy Server cung cấp.
7. Kiểm tra kết quả
Tại máy Server, mở DNS Manager, bung Server1\Forward Lookup Zones, kiểm tra trong zone MSOpenLab.com đã có host record của máy Client
Trong cửa sổ DNS Manager, bung Server1\Reverse Lookup Zones, kiểm tra có pointer record của máy Client

Nguồn: http://msopenlab.com
II. Chuẩn bị
Bài lab bao gồm 2 máy:
- Máy Server: Windows Server 2008
- Máy Client: Windows Server 2008 hoặc Windows Vista
III. Thực hiện
1. Cấu hình TCP/IPv6
Tại máy Server, log on Administrator, vào Start\Settings chọn Network Connections
Trong cửa sổ Network Connections, chuột phải Local Area Connection chọn Properties
Hộp thoại Local Area Connection Properties, bỏ dấu chọn Internet Protocol Version 4 (TCP/IPv4), chọn Internet Protocol Version 6 (TCP/IPv6), chọn Properties
Trong cửa sổ Internet Protocol Version 6 (TCP/IPv6) Properties, nhập thông số TCP/IP như sau:
IPv6 address: fc00:192:168:5::25
Subnet prefix length: 64
Preferred DNS server: fc00:192:168:5::25
Mở Windows Firewall từ Control Panel, chọn Change settings
Trong hộp thoại Windows Firewall Settings, chọn Off, chọn OK
Mở System từ Control Panel, trong cửa sổ System chọn Change settings
Trong hộp thoại System Properties, vào tab Computer Name, chọn Change
Hộp thoại Computer Name/Domain Changes, chọn More
Hộp thoại DNS Suffix and NetBIOS Computer Name, nhập MSOpenLab.com vào ô Primary DNS suffix of this computer, chọn OK 3 lần
Trong hộp thoại System Properties, chọn Close
Hộp thoại yêu cầu restart máy, chọn Restart Now
Sau khi khởi động máy thành công, log on Administrator, mở command line, gõ lệnh ipconfig /all, kiểm tra thông tin như trong hình bên dưới.
2. Cài đặt DNS Server role
Tại máy Server, log on Administrator, mở Server Manager từ Administrative Tools
Trong cửa sổ Server Manager, chuột phải Roles chọn Add Roles
Hộp thoại Before You Begin, chọn Next
Trong hộp thoại Select Server Roles, đánh dấu chọn DNS Server, chọn Next
Hộp thoại DNS Server, chọn Next
Hộp thoại Confirm Installation Selections, chọn Install
Hộp thoại Install Results, chọn Close
3. Cấu hình DNS Server
Tại máy Server, sau khi cài đặt DNS thành công, mở DNS Manager từ Administrative Tools
Trong cửa sổ DNS Manager, bung Server1, chuột phải Forward Lookup Zones, chọn New Zone
Hộp thoại Welcome to the New Zone Wizard, chọn Next
Trong hộp thoại Zone Type, chọn Primary zone, chọn Next
Hộp thoại Zone Name, nhập MSOpenLab.com vào ô Zone name, chọn Next
Hộp thoại Zone File, chọn Next
Trong hộp thoại Dynamic Update, chọn Allow both nonsecure and secure dynamic updates, chọn Next
Hộp thoại Completing the New Zone Wizard, chọn Finish
Trong cửa sổ DNS Manager, kiểm tra tạo thành công zone MSOpenLab.com, trong zone MSOpenLab.com có IPv6 Host record server1
Trong cửa sổ DNS Manager, chuột phải Reverse Lookup Zones, chọn New Zone
Hộp thoại Welcome to the New Zone Wizard, chọn Next
Trong hộp thoại Zone Type, chọn Primary zone, chọn Next
Trong hộp thoại Reverse Lookup Zone Name, chọn IPv6 Reverse Lookup Zone, chọn Next
Trong hộp thoại Reverse Lookup Zone Name, nhập địa chỉ như trong hình bên dưới
Hộp thoại Zone File, nhập msopenlabnet.dns vào ô Create a new file with this file name, chọn Next
Trong hộp thoại Dynamic Update, chọn Allow both nonsecure and secure dynamic updates, chọn Next
Hộp thoại Completing the New Zone Wizard, chọn Finish
Trong cửa sổ DNS Manager, kiểm tra tạo thành công Reverse Lookup Zone
Mở Command Line, gõ lệnh ipconfig /registerdns
Mở DNS Manager, vảo zone 9.0.0.0.8.6.1.0.2.9.1.0.0.0.c.f.ip6.arpa, kiểm tra có Pointer record như trong hình bên dưới
Mở Command Line, gõ lệnh dnscmd /config /enableIPv6 1
4. Cài đặt DHCP Server role
Tại máy Server, mở Server Manager từ Administrative Tools, chuột phải Roles chọn Add Roles
Hộp thoại Before You Begin, chọn Next
Trong hộp thoại Select Server Roles, đánh dấu chọn DHCP Server, chọn Next
Hộp thoại DHCP Server, chọn Next
Hộp thoại Select Network Connection Bindings, kiểm tra có đánh dấu chọn fc00:192:168:5::25, chọn Next
Hộp thoại Specify IPv4 DNS Server Settings, chọn Next
Hộp thoại Specify IPv4 WINS Server Settings, chọn WINS is not required for applications on the network, chọn Next
Hộp thoại Add or Edit DHCP Scopes, chọn Next
Trong hộp thoại Configure DHCPv6 Stateless Mode, chọn Enable DHCPv6 stateless mode for this server, chọn Next
Trong hộp thoại Specify IPv6 DNS Server Settings, nhập MSOpenLab.com vào ô Parent Domain, nhập fc00:192:168:5::25 vào ôPreferred DNS Server IPv6 Address, chọn Next
Hộp thoại Confirm Installation Selections, chọn Install
Hộp thoại Installation Results, chọn Close
5. Cấu hình DHCP Scope
Tại máy Server, sau khi cài đặt DHCP thành công, mở DHCP từ Administrative Tools
Trong cửa sổ DHCP, bung server1.msopenlab.com, chuột phải IPv6 chọn New Scope
Hộp thoại Welcome to the New Scope Wizard, chọn Next
Trong hộp thoại Scope Name, nhập IPv6 Scope vảo ô Name, chọn Next
Trong hộp thoại Scope Prefix nhập fc00:92:168:5:: vào ô Prefix, chọn Next
Hộp thoại Add Exclusions, chọn Next
Hộp thoại Scope Lease, chọn Next
Hộp thoại Completing the New Scope Wizard, chọn Finish
Trong cửa sổ DHCP, bung IPv6, chuột phải Scope[fc00:192:168:5::25] chọn Properties
Trong hộp thoại Scope[fc00:192:168:5::25] Scope Properties, qua tab DNS, chọn Always dynamically update DNS AAA and PTR record, chọn OK
6. Cấu hình Client sử dụng IPv6
Tại máy Client, log on Administrator, vào Start\Setting chọn Network Connections
Trong cửa sổ Network Connection, chuột phải Local Area Connection, chọn Properties
Trong hộp thoại Local Area Connection Properties, bỏ dấu chọn Internet Protocol Version 4 (TCP/IPv4), đánh dấu chọn Internet Protocol Version 6 (TCP/IPv6), chọn Properties
Trong hộp thoại Internet Protocol Version 6 (TCP/IPv6) Properties, chọn Obtain an IPv6 address automatically và Obtain DNS server address automatically, chọn OK 2 lần
Mở Command Line, gõ lệnh như hình bên dưới
Mở System từ Control Panel, chọn Change settings
Trong hộp thoại System Properties, chọn Change
Hộp thoại Computer Name/Domain Changes, chọn More
Trong hộp thoại DNS Suffix and NetbIOS Computer Name, nhập MSOpenLab.com vào ô Primary DNS suffix of this computer, chọn OK3 lần
Hộp thoại System Properties, chọn Close
Hộp thoại Microsoft Windows, chọn Restart Now
Sau khi khởi động máy Client, mở Command Line, gõ lệnh ipconfig /registerdns
Trong cửa sổ Command Line, gõ lệnh ipconfig /all, kiểm tra máy Client nhận được thông số TCP/IP từ máy Server cung cấp.
7. Kiểm tra kết quả
Tại máy Server, mở DNS Manager, bung Server1\Forward Lookup Zones, kiểm tra trong zone MSOpenLab.com đã có host record của máy Client
Trong cửa sổ DNS Manager, bung Server1\Reverse Lookup Zones, kiểm tra có pointer record của máy Client
Nguồn: http://msopenlab.com

Admin- Admin
- Tổng số bài gửi : 104
Join date : 25/06/2012
Age : 34
Đến từ : Hồ Chí Minh -

![]()
![]()
![]()

 Similar topics
» IPv6 - nguồn địa chỉ web bất tận đã được khai thác
» Phần I: TỔNG QUAN VỀ IPV6
» Tạo 1 phân vùng bí mật trên USB
» Truy cập Internet trên Ubuntu với USB D-com 3G Viettel
» 6 hiểu lầm lớn nhất về IPv6
» Phần I: TỔNG QUAN VỀ IPV6
» Tạo 1 phân vùng bí mật trên USB
» Truy cập Internet trên Ubuntu với USB D-com 3G Viettel
» 6 hiểu lầm lớn nhất về IPv6
Tài liệu :: Luli :: Công nghệ nổi bật :: IPv6
Trang 1 trong tổng số 1 trang
Permissions in this forum:
Bạn không có quyền trả lời bài viết|
|
|